Showing posts with label crafts. Show all posts

Friday, March 2, 2012

Just call me grandma.


As of late, I've been completely obsessing about crocheting.  I know, I know.  Go ahead, call me a grandma.  I used to think the same thing.  But, hold your horses cowboy.  Did you see those cute little hats with ears, or the cute little flower on the ear warmer?!  How adorable are they?!  Who wouldn't want their little kid to have handmade booties?!  My eyes have been opened.  I have now opened up a complete new crafting door that leads to this lovely realm of crocheting!  I have already tackled two projects (the ear warmer and one version of an infinity scarf) and I must say, I'm starting to get the hang of it!  I have now completed 7, count 'em 7, infinity scarves and two ear warmers with flowers on them.   My next project to attempt is a toddler hat with a little bow or flower on it.  I'm trying to become a pro at it so I can sell some at the next Arts & Crafts Festival that's near us!  Kind of daunting to think about doing my first ever craft festival, but I'm sure I'll love it once I get the chance to have some experience!  It always seems so scary when you try something new and, most of the time, it turns out even better than you expected!  So, let's keep our fingers crossed!

On another note, I get to see my family this weekend!!!  Sooo excited to celebrate my nephew's first birthday with the entire family up in Indiana!  Let's just hope these storms that are supposed to hit central KY don't interfere with our weekend plans! 

HAPPY FRIDAY!  Enjoy your weekend!

Friday, January 13, 2012

Silhouette Collages

I know this post is a little late considering Christmas was 3 1/2 weeks ago, but I did this project very last minute to adorn some empty wall space in our front room before my family got into town for the holidays.  I had a few canvas boards laying around from past projects that I had done, so I decided to make what I'm now deeming "Silhouette Collages."  I threw a few materials that I had laying around my house together to create these cost-effective, cute little gems.  All you need is a (few) canvas boards, mod podge, a paint brush/foam brush, old newspaper, and packing paper (yea, that's right, packing paper... I got a decent size roll of it from the Dollar Tree to use as wrapping paper for presents).


Simply tear a few pieces of newspaper, randomly mod podge it onto your boards, cut out any silhouette from the packing paper, then mod podge your silhouette on top of your 'collage' of newspaper and this is what you get....


The reindeer is my personal favorite!  When I was thinking of this project and how I wanted to implement it I thought of few other ways you could try such as using a pattern fabric w/ a solid color silhouette (or vice versa) or painting a black background and making the silhouette from an awesome festive patterned fabric.  But, for this project I wanted to keep it simple so I could place them in different rooms without having to worry much about matching the decor. 

Have fun exploring and playing around with the many options of making 'Silhouette Collages'! 

Warning:  More past-due Christmas posts are on the horizon (mainly just Christmas presents that I made for people that I couldn't post on here until after I gave them their presents)! 

Tuesday, January 3, 2012

Handmade Wedding Gift, Numero Dos

You may remember this post from a few months ago of a personalized wedding gift that I made for one of my friends.  Well, I finally finished my second handmade wedding gift (a couple weeks late) for our friends Jeremy and Joanna Hunter.  I had to wait a few weeks after their wedding to actually make the gift since I planned on using one of their wedding photos... so that's my excuse for the gift being 3 months late and I'm sticking to it! Once again, sorry for the bad quality photos, I had to snap a few shots of the finished product with my phone just before giving them their gift before they left town!


Materials needed:
-Paint
-Foam Brush
-Ribbon
-Scrapbook Paper
-Alphabet Stickers
-3-8x10 canvases
-Mod Podge

All you have to do is follow this tutorial over at blue cricket design for the photo canvas, paint the other two canvases a color of your choice, apply stickers, mod podge over the paint and stickers, add ribbon, then you're done!  

Unfortunately, the stickers part wasn't that simple for me.  I found some alphabet stickers at the Dollar Tree that were silver and rainbow heart stickers at Michaels.  Seeing how I wasn't going for the 70's retro style, I had to paint the stickers yellow then mod podge over them so the paint wouldn't chip and they would be more secure on the canvas. 

As always, you can personalize this project by adding more photos, a quote, or anything that's significant to you.  I chose to do the couple's initials and the date they got married (I couldn't resist leaving the date out 9.10.11, how cute?!).   


 Go and be crafty!

Much love,
Stephanie P.

Monday, December 12, 2011

$1 Christmas Craft

I was moseying around the house last week in an attempt to get a little bit more organized in the new house when I found a bag of felt that I had purchased at Hobby Lobby to make a few felt flowers.  Seeing how I was over the whole felt flower kick I was on one day, I decided I could use them for some other project... maybe even a Christmas project (our house is lacking a little in the Christmas decor department).  I began messing around with the felt and figured I would attempt to make a set of little Christmas trees to adorn our (sad excuse for a) mantle.

This is what I came up with.


And, this is how to do it.

1) Gather materials: 3 pieces of felt (found at the craft store for 4 for $1), scissors, tacky glue, and binder clips (optional).


2) Use one piece of felt and make a cone shape starting from one of the corners. 


3) Glue the edge down and then cut the bottom (sort of like a semi-circle) so the 'cone' will stand up evenly.


4) Place binder clips over the area you just glued together to help it adhere. (This step might be unecessary, but I found that the felt didn't really stick together with the tacky glue unless forced.)  Let your trees sit about 10 minutes before taking the clips off.  


5) Repeat steps 2-4 with three different sized cones.  (I was able to make all of my cone shapes out of one piece of felt.)


6) Decorate your trees however you'd like!  The good thing about this project is that you don't have to glue down any of the decorations on your trees because the felt pieces stick to one another!  So you can redecorate your trees as often as you'd like!

As a side note, I created the spiral design by drawing a circle on the felt (about the size of a cd) and cutting it into a spiral.  This makes it very easy to drape the spirals over the cones. 


I created the 'bunting tree' by making anther spiral out of a circle and cutting little triangles out of the green felt.  I found it helpful to use a little dab of glue on the triangles to keep them in place.  And, the smallest tree was created simply by cutting small circles out of the felt (pretty obvious, but I didn't want to leave the little guy unmentioned!)  


And here's our (sad excuse for a) mantle with felt trees and a little bunting piece I made with the extra felt and an empty frame I had laying around.


Merry Christmas!
Stephanie P.

Wednesday, November 30, 2011

Getting in the holiday spirit.


HAPPY DECEMBER!  To get us all in the holiday spirit, I'm going to give you my little rendition of the 12 Days of Christmas -- with 12 cute Christmas decorating ideas to spruce up your home this holiday season.


If you click on the pictures you will be redirected to the original source that may have some instructions on how to DIY.

I just love festive decorations, especially at Christmas and for some reason, having our own house this year makes me want to decorate 10 times more!  Hopefully you'll be inspired to decorate and maybe even get a little bit crafty and make your own decorations!  Be creative and think outside the box!

** If you haven't already noticed, I've also made a Christmas playlist to spread some holiday cheer!  So, yes, I will be listening to Christmas music from now until the end of the year!  : )

HAPPY HOLIDAYS!

Much love,

Stephanie P.

Tuesday, November 22, 2011

Recreate

As I was browsing Pinterest  (surprise, surprise) a few weeks ago, I came across this wreath, thought it was cute, so I decided that it would be the perfect project to adorn our new house!  With a few tweaks, I made my own rendition with green and purple hues.  Here's how to do it:
 
Materials:
   1)  Wreath (I got mine at Micheal's with one of their 40% off coupons for under $5)
   2)  Wooden numbers (you could also do an initial or letters of some sort)
   3)  Paint to paint your numbers/letters
   4)  Glue gun with glue sticks
   5)  Fake flowers (taken off of the stems; also keep some of the leaves to use as a filler) (I got mine from 
        the $1 store and used 3 or 4 bundles)

The process is quite simple:
   1)  Paint your numbers/letters (allow them to dry)
   2)  Start gluing your flowers! (I started randomly placing some leaves towards the edges and then 
        placed the flowers down)  *You might want to place your flowers down before gluing, just to make 
        sure you like the placement.  
   3)  Once all of your flowers are glued down and in place, glue your numbers/letters down.
   4)  Hang your wreath!


My finished Project!

 
This is a really versatile project and can be personalized for gifts as well!  Since the flowers are glued on, you should be able to easily reuse the wreath to change things up a bit from season to season.  (I also thought about using wire to attach the flowers, it just seemed like too much trouble... but that's another option if you know you'll want to reuse the wreath).  It also costs around $10 (if you use your coupons!! : ) )   

Much love,
Stephanie P.

Wednesday, November 9, 2011

Handmade Wedding Gift, Numero Uno.

Adam and I had a few of our friends who recently got married.  Like any wedding attendee, I then started thinking about what type of gift I was going to give them (because we all know that's 'the girl's job' and if we left it up to our husbands they would either a) receive nothing or b) receive something having to do with ESPN or video games! haha).

I don't know about you, but I don't like to settle for giving someone your typical dishware, cutlery, or a traditional set of bath towels (when they don't even remember registering for what seems like 20 sets of 3 different colors! <-- we totally did that, partially because of Adam's love for manning the registry 'gun'!)  So I began the search for a more personalized, thoughtful gift.  As you all know, Pinterest  has become an everyday occurrence for me these days, and I stumbled across a few ideas of fun, creative (and inexpensive) ways to spruce up any blank wall space in your house.  I thought some of the ideas could be tweaked a little bit here and there to make a great wedding gift.     


 (click on the pictures above for instructions on how dittledattle did hers)

Here is how I altered this idea a little bit to personalize it for the newlyweds:

Materials Used:
1)  Canvas Panels (3 varying sizes- I think I used 8x10s, 9x12s and 5x7s, or something similar)
2)  Mod Podge 
3)  Foam Brush
4)  Acrylic Paint
5)  Scrapbook Paper
6)  Dry Paper Towel
7)  Ribbon
8)  Hot Glue Gun
9)  Curtain Rod

* I forgot to take some pictures of the step-by-step process of the project, but it's simple enough to explain (and if you have any questions you can just comment on this post).  

1)  Trim scrapbook paper to fit the size of your canvases.  You will want to leave a little bit of a space between the outside edges and your paper to avoid overhang.  Don't worry, the blank space will be covered by paint later on.

2)  Spread Mod Podge over the entire front part of your canvas, place paper on top of the Mod Podge  (here it may be helpful to use a credit card or something to press the paper and smooth out any wrinkles).  

3)  After all the wrinkles are out, apply another coat of Mod Podge on the top of your paper; making sure all corners are pressed down.  Allow to dry.

4)  Paint letters.  I free-handed my letters, but you could use tracing paper to transfer any font onto the canvas.  (I used the couple's last name for this project, but this can be altered for any holiday, saying, or word to make it special for you)  Paint another coat over your letters, if needed.

5)  Use a dry paper towel to rub paint over the edged of the paper to create the rustic border effect.   

6)  Once you have all of your canvases complete (and dry), you can now measure your ribbon so that the canvases will hang evenly from a curtain rod.   

7)  Attach ribbons by generously applying hot glue to the back of the canvas and your ribbons.

8)  Hang your lovely work of art from the curtain rod and SHOW IT OFF!


 The (semi) finished product!  (If I get a chance to sneak a picture of this actually hanging on the wall I will share it with you later!  I was in a little bit of a time crunch and couldn't hang up the sample before having to wrap it and give it away.)
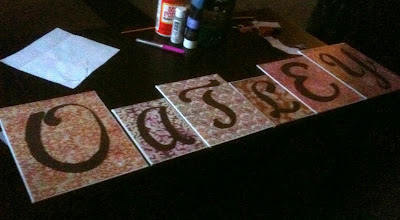
*Once again, sorry for the horrible phone pictures, hopefully that'll change soon!

Even though it may seem like there are a lot of steps, this project is fun and easy.  It's a simple project that can be completed while watching your favorite tv show... that's what I love about doing (most) crafts!  

A special congrats to the Oatley's and their new journey together!  

~Stephanie P.