Wednesday, November 30, 2011

Getting in the holiday spirit.


HAPPY DECEMBER!  To get us all in the holiday spirit, I'm going to give you my little rendition of the 12 Days of Christmas -- with 12 cute Christmas decorating ideas to spruce up your home this holiday season.


If you click on the pictures you will be redirected to the original source that may have some instructions on how to DIY.

I just love festive decorations, especially at Christmas and for some reason, having our own house this year makes me want to decorate 10 times more!  Hopefully you'll be inspired to decorate and maybe even get a little bit crafty and make your own decorations!  Be creative and think outside the box!

** If you haven't already noticed, I've also made a Christmas playlist to spread some holiday cheer!  So, yes, I will be listening to Christmas music from now until the end of the year!  : )

HAPPY HOLIDAYS!

Much love,

Stephanie P.

Tuesday, November 29, 2011

Mini Pumpkin Cream Pies


My contribution to the Thanksgiving meal was very limited since we were joining Adam's parents at their place for Thanksgiving and since we don't have any of our appliances hooked up and are still waiting for our fancy stainless steel, french-door refrigerator to arrive (soo can't wait for it to come).  I'm definitely not complaining about the fact that I did not have to slave over the stove, rush to feed everyone, and could hold off yet another year before my first attempt at making a turkey by myself (which I'm sure will be a complete disaster... which is why I will have a back-up plan whenever the time may come or I may even have a few trial runs before Thanksgiving rolls around again!).  I did however make these cute little pumpkin cream pies!  They were just as delicious as they are cute!  Click here to go to thecraftingchicks.com for the recipe (such a cute blog).  It's quite simple, and I even cheated a little bit to speed up the process by using the little pudding cups instead of making my own jello out of the box (that way we didn't have to wait for the jello to set).  These little cuties were a hit and would even make for a great gift to send home with your visitors or as little place holders for your guests.  I might even try to create my own mini-pot desserts... maybe an oreo cream pie, chocolate brownie blast, or a nice red velvet concoction for Christmas!?!  The possibilities are endless!

Tuesday, November 22, 2011

Recreate

As I was browsing Pinterest  (surprise, surprise) a few weeks ago, I came across this wreath, thought it was cute, so I decided that it would be the perfect project to adorn our new house!  With a few tweaks, I made my own rendition with green and purple hues.  Here's how to do it:
 
Materials:
   1)  Wreath (I got mine at Micheal's with one of their 40% off coupons for under $5)
   2)  Wooden numbers (you could also do an initial or letters of some sort)
   3)  Paint to paint your numbers/letters
   4)  Glue gun with glue sticks
   5)  Fake flowers (taken off of the stems; also keep some of the leaves to use as a filler) (I got mine from 
        the $1 store and used 3 or 4 bundles)

The process is quite simple:
   1)  Paint your numbers/letters (allow them to dry)
   2)  Start gluing your flowers! (I started randomly placing some leaves towards the edges and then 
        placed the flowers down)  *You might want to place your flowers down before gluing, just to make 
        sure you like the placement.  
   3)  Once all of your flowers are glued down and in place, glue your numbers/letters down.
   4)  Hang your wreath!


My finished Project!

 
This is a really versatile project and can be personalized for gifts as well!  Since the flowers are glued on, you should be able to easily reuse the wreath to change things up a bit from season to season.  (I also thought about using wire to attach the flowers, it just seemed like too much trouble... but that's another option if you know you'll want to reuse the wreath).  It also costs around $10 (if you use your coupons!! : ) )   

Much love,
Stephanie P.

Wednesday, November 16, 2011

Rainy Day Blues

Rainy Day Blues


Not sure about you, but I'm not really liking this whole rainy-day weather gig we have going on in Kentucky.  Hopefully it will clear up soon enough.  In the meantime, grab a cup of hot cocoa, snuggle under a nice warm blanket, turn on your favorite chick-flick, and enjoy today's 'rainy-day blues' picks.  (I wish all of those were in my near future, but work and other duties are calling my name. bleh.)  Must... keep... moving. 

Happy Hump Day!  Hopefully you can find something good and inspiring on this drab, dreary day!

Monday, November 14, 2011

Photoshoot with Amaya (preview)

This past Saturday, I had the privilege of organizing a photo shoot with our friends' little girl, Amaya.  Amaya is about to become a big sister and her parents wanted me to take a few shots of her before her brother arrives!  I asked my friend Tara to join us on the shoot because 1) she is an awesome photographer and has a great photographic eye, 2) it's always nice to have a second shooter or someone else who can help brainstorm ideas and keep the kids entertained and 3) I don't have a very nice camera  of my own (yet) <--- it's a work in progress.  It wasn't long into the shoot when we realized that Amaya definitely loves the camera!  She is just the cutest thing.


A special thanks to our friends Lincoln and Brittany for letting us spend a day at the park with your precious little girl.  We can't wait until Baby Blake arrives!

Wednesday, November 9, 2011

Handmade Wedding Gift, Numero Uno.

Adam and I had a few of our friends who recently got married.  Like any wedding attendee, I then started thinking about what type of gift I was going to give them (because we all know that's 'the girl's job' and if we left it up to our husbands they would either a) receive nothing or b) receive something having to do with ESPN or video games! haha).

I don't know about you, but I don't like to settle for giving someone your typical dishware, cutlery, or a traditional set of bath towels (when they don't even remember registering for what seems like 20 sets of 3 different colors! <-- we totally did that, partially because of Adam's love for manning the registry 'gun'!)  So I began the search for a more personalized, thoughtful gift.  As you all know, Pinterest  has become an everyday occurrence for me these days, and I stumbled across a few ideas of fun, creative (and inexpensive) ways to spruce up any blank wall space in your house.  I thought some of the ideas could be tweaked a little bit here and there to make a great wedding gift.     


 (click on the pictures above for instructions on how dittledattle did hers)

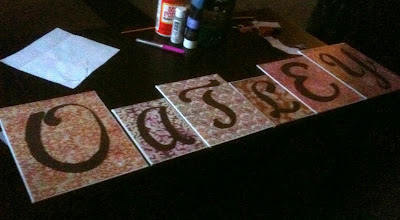
Here is how I altered this idea a little bit to personalize it for the newlyweds:

Materials Used:
1)  Canvas Panels (3 varying sizes- I think I used 8x10s, 9x12s and 5x7s, or something similar)
2)  Mod Podge 
3)  Foam Brush
4)  Acrylic Paint
5)  Scrapbook Paper
6)  Dry Paper Towel
7)  Ribbon
8)  Hot Glue Gun
9)  Curtain Rod

* I forgot to take some pictures of the step-by-step process of the project, but it's simple enough to explain (and if you have any questions you can just comment on this post).  

1)  Trim scrapbook paper to fit the size of your canvases.  You will want to leave a little bit of a space between the outside edges and your paper to avoid overhang.  Don't worry, the blank space will be covered by paint later on.

2)  Spread Mod Podge over the entire front part of your canvas, place paper on top of the Mod Podge  (here it may be helpful to use a credit card or something to press the paper and smooth out any wrinkles).  

3)  After all the wrinkles are out, apply another coat of Mod Podge on the top of your paper; making sure all corners are pressed down.  Allow to dry.

4)  Paint letters.  I free-handed my letters, but you could use tracing paper to transfer any font onto the canvas.  (I used the couple's last name for this project, but this can be altered for any holiday, saying, or word to make it special for you)  Paint another coat over your letters, if needed.

5)  Use a dry paper towel to rub paint over the edged of the paper to create the rustic border effect.   

6)  Once you have all of your canvases complete (and dry), you can now measure your ribbon so that the canvases will hang evenly from a curtain rod.   

7)  Attach ribbons by generously applying hot glue to the back of the canvas and your ribbons.

8)  Hang your lovely work of art from the curtain rod and SHOW IT OFF!


 The (semi) finished product!  (If I get a chance to sneak a picture of this actually hanging on the wall I will share it with you later!  I was in a little bit of a time crunch and couldn't hang up the sample before having to wrap it and give it away.)

*Once again, sorry for the horrible phone pictures, hopefully that'll change soon!

Even though it may seem like there are a lot of steps, this project is fun and easy.  It's a simple project that can be completed while watching your favorite tv show... that's what I love about doing (most) crafts!  

A special congrats to the Oatley's and their new journey together!  

~Stephanie P.